
How to use Digible on iPad
By Feran, Founder of DigibleUpdated 13 October 2026
Write on the Bible page with Apple Pencil or your finger and add verses, stickers and photos. Words in bold and the small button pictures are what you will see in the app. Each heading links to its own steps, so you can share the exact one.
Other devices:iPhoneAndroid tabletAndroid phone
Getting started
Find your way around
- Four tabs sit at the bottom: Home, Journals, Notes and Paths.
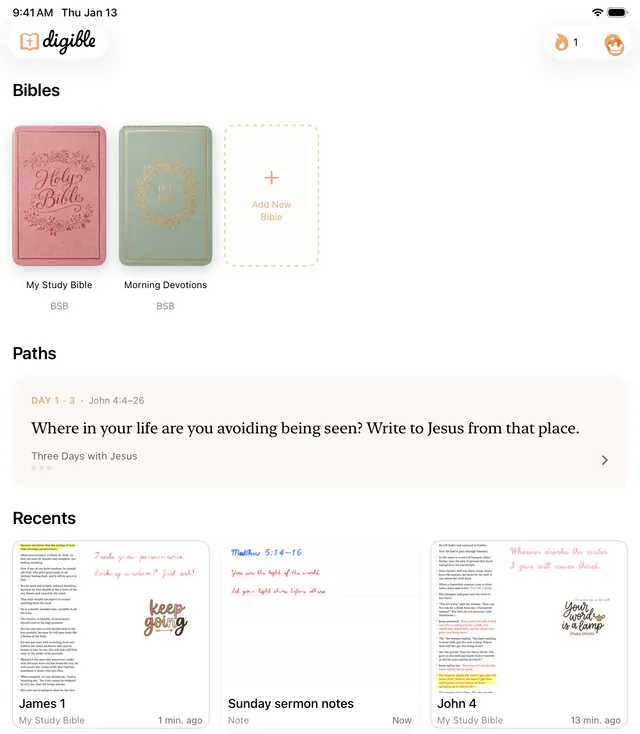
- Your Bibles are at the top of Home. Tap one to open it.
- Your profile and settings open from your photo at the top right of Home.

Watch a walkthrough
Creator Jaren T. shows how to start Bible journaling on an iPad with Digible, step by step (6:41). Watch the walkthrough.
Open a Bible
On Home, tap a Bible to open it.
Move between chapters and books
- Tap the book and chapter at the top of the page (for example John 3). Books opens with the book you're in already open.
- Tap a book to see its chapters, then tap a chapter.
You can also swipe left or right with one finger for the next or previous chapter. Apple Pencil never turns the page, so you can write right up to the edge.
Add another Bible
Each Bible has its own name, cover and translation, so you can keep one for study and one for journaling.
- On Home, scroll your Bibles to the end and tap Add New Bible.
- Type a name, tap Select Translation to pick a translation, and choose a cover under Cover Art.
- Tap Add Bible.
What's free and what needs Pro
Digible is free to download with a limited preview. New readers can try five unique chapters and three journal pages before subscribing to Digible Pro for continued reading and journaling. Phone highlights and study Paths have their own limits.
If something you tap opens the subscription screen, you've reached the preview. Anything you've already made stays yours to open and edit.
Writing and drawing
Write on the page
Open a Bible and write anywhere on the page with Apple Pencil. No Pencil? Turn on Finger Drawing.
The toolbar
A floating toolbar sits over the page.
- Pens: Fountain Pen, Pen, Pencil, Shader, Highlighter, Fineliner, Watercolor and Crayon.
- Then
 Eraser,
  Lasso selection and the ruler, last in the toolbar.
 - To add things to the page:
 Stickers,
  Text box,
  Verse box,
  Shape and
  Photo.
 - Drag the toolbar to move it. Drag it into a corner and it shrinks to a round button showing your pen; tap that button to bring the toolbar back.

Change pen colour and size
- Tap a pen to use it.
- Tap it again (or press and hold it) for its colours and the Size slider.
- For any other colour, tap Custom colour. Colours you save appear next to the others; press and hold one and tap Remove colour to take it off.
Erase
Tap Eraser, then tap it again for its options:
- Pixel rubs ink away where you touch. Object removes whole strokes at a touch.
- Size sets how big the eraser is.
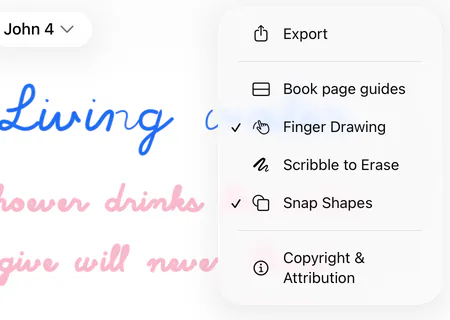
- Scribble to Erase lets you scribble over writing to delete it. It's off until you turn it on under
 at the top right of a Bible page.
Undo and redo
Tap  Undo or
  Redo at the top left of a Bible page or note. They're faded when there's nothing to undo.
Select and move with the lasso
- Tap Lasso selection in the toolbar.
- Draw a loop around what you want. It picks up writing and anything you've added, together.
- Drag to move it, pinch to resize it or twist with two fingers to rotate it.
- Use the buttons above it to copy, cut, duplicate or delete it. To paste, press and hold an empty spot and tap Paste.
Tap again to go back to your pen.
Draw straight lines
Tap the ruler, last in the toolbar, to put a ruler on the page, then draw along its edge with any pen. Tap it again to put it away.
Snap Shapes also helps: draw a line, circle or box and hold your pen still at the end, and it turns into a clean shape. It's on unless you turn it off under at the top right of a Bible page.
Write with your finger
- Open a Bible chapter.
- Tap at the top right.
- Turn on Finger Drawing.
With Finger Drawing on, one finger writes and two fingers scroll. The setting applies to your notes too.
Type on a page
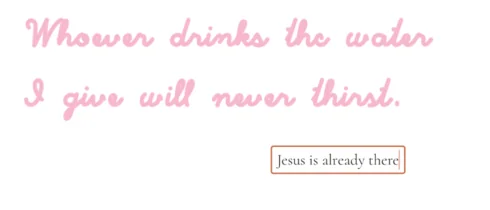
Pages and notes are handwritten, so tapping the page won't bring up the keyboard. To type, tap Text box in the toolbar. A box appears with the keyboard ready; type, then tap Done above the keyboard. To change the words later, tap the box once to select it, then tap it again.
Add more pages to a chapter
- To add a page, tap
 Add journal page at the top right of the chapter. A chapter can have up to 10 pages.
 - Once a chapter has two or more pages, a counter such as 2/3 appears beside it. Tap the counter to go to the next page.
- To delete a page, open Journals, press and hold the page's card, tap Delete, then confirm.

Adding things to a page
Add a verse with the Verse box
The Verse box puts Scripture on your page or note as typed text, so you don't have to copy it out.
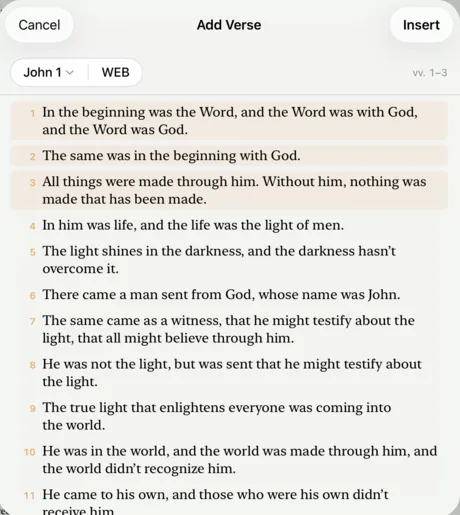
- Tap Verse box in the toolbar. Add Verse opens.
- Tap the book and chapter at the top to choose another passage, or the translation next to it to change translation.
- Tap a verse, then tap a later verse to take in several.
- Tap Insert.
The verses land on your page with their reference underneath. It starts in your preferred translation. Move or resize the box like anything else you add, and tap it twice to edit the words.
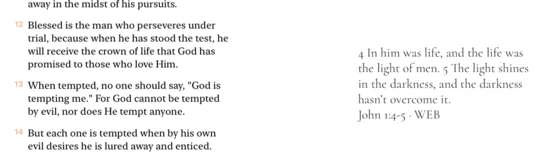
Drag a verse onto a page
Drag verses from a second Bible straight onto your page. They land as a Verse box.
- On a Bible page, tap
 Compare translation at the top right. In a note, tap Open Bible reader at the top, then tap it again to dock the reader beside the page.
 - Tap a verse to mark it. Tap a later verse to take in several.
- Press and hold the marked verses and drag them onto your page.
Add stickers
- Tap Stickers in the toolbar.
- Pick a category, such as Scripture, Florals, Washi or Frames. Stickers you've used are under Recent.
- Tap a sticker to add it. Add as many as you like, then tap Done.
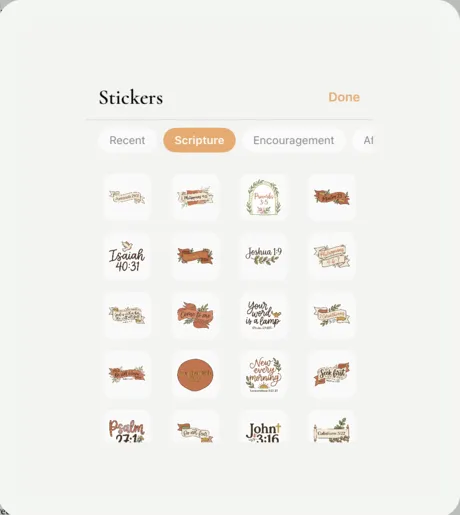
Want more? We have free stickers to download.
Add shapes
- Tap Shape in the toolbar and pick one: Heart, Cross, Circle, Rectangle, Star, Triangle, Line or Arrow.
- To change its colour, tap the shape, then
 Style at the start of the bar above it. Choose an Edge colour, or turn on Fill shape for a fill colour and opacity.
You can also draw a shape by hand and hold your pen still at the end to snap it neat (see Draw straight lines).
Add photos
Tap Photo in the toolbar and choose a photo from your library.
Move, resize or delete what you've added
- Tap a sticker, photo, shape or text box with your finger to select it. Drag it to move it.
- Drag a corner circle (or pinch) to resize it. Shapes, stickers and photos also have a round knob to rotate them.
- The bar above it has, from left to right, Copy, Cut, Duplicate, Bring to Front, Send to Back, Lock and Delete.
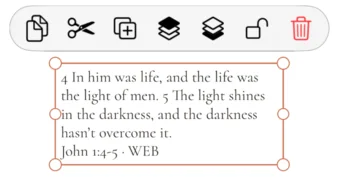
To paste, press and hold an empty spot on the page and tap Paste.
Verses and Bibles
Highlight a verse
On iPad you highlight right on the page: tap  Highlighter in the toolbar and draw over the words.
Compare two translations
- On a Bible page, tap Compare translation at the top right. A second Bible opens in a floating panel.
- Tap the translation at the top of the panel to change it, or the book and chapter to go somewhere else. Swipe inside the panel to turn its chapter.
- Drag the panel to move it and its corner to resize it.
- Tap the X on the panel, or again, to close it.
You can drag verses from the panel onto your page (see Drag a verse onto a page).
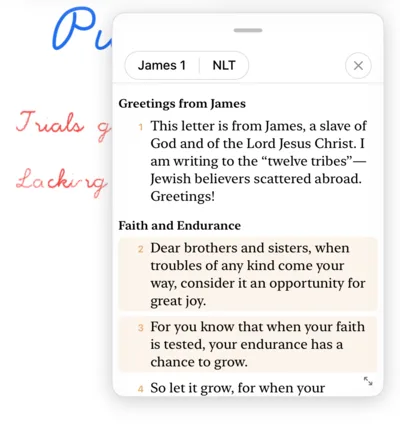
Read another translation
Each Bible keeps the translation it was made with. To read another translation, add a Bible in that translation:
- On Home, scroll your Bibles to the end and tap Add New Bible.
- Tap Select Translation. Search by name or language, or choose a Language.
- Pick one and tap Add Bible.
Translations that need downloading download when you add the Bible, so stay online until it's ready. If it fails, tap the button again to retry.
Set your preferred translation
On Home, tap your photo at the top right, then under Reading tap Preferred translation. It's used when you look up verses in notes. Each Bible keeps its own translation.
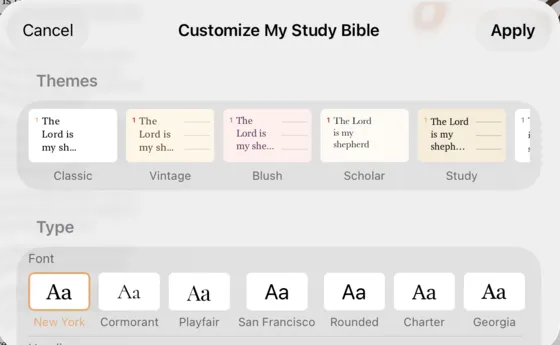
Customise a Bible: paper, ink and type
- Open the Bible and tap
 Customize Bible at the top right.
 - Choose a look under Themes, or set it yourself: Type (font, heading, size and spacing), Page (paper) and Text (ink colour, accent and red letters).
- Tap Apply.
On iPad, Page also has ruled or dotted lines, text width and text position. If the Bible already has journal pages, you choose All Journals or only new pages. You can undo it later with Restore Previous Layouts in the same sheet.
To change the cover or name, see Rename a Bible or change its cover.
Rename a Bible or change its cover
- On Home, press and hold the Bible and tap Edit.
- Change the name or the cover in Edit Bible.
- Tap Save.
To decorate the cover with charms, ribbons and more, see Decorate your Bible's cover.
Delete a Bible
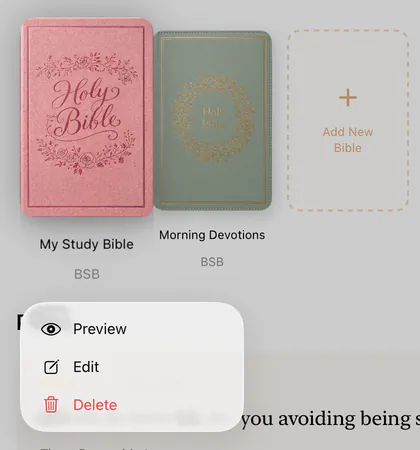
On Home, press and hold the Bible, tap Delete, then Delete again. The Bible leaves your shelf, and your journal pages are kept.
Notes and folders
Make a note
- Open the Notes tab.
- Tap +, then New Note.
A note is a blank page that isn't tied to a chapter, with the same toolbar as a Bible page. A new page appears at the end as you fill one. Paper style is under , Page settings.
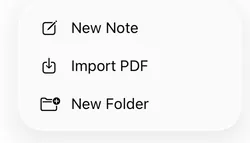
Write on a PDF
- Open the Notes tab.
- Tap +, then Import PDF and pick a PDF (up to 50 MB) from Files.
It opens as a note named after the file, ready to write on.
Rename or delete a page or note
- In Journals, Notes, a folder or Recents on Home, press and hold a card for Rename and Delete.
- To change several at once, press and hold a card, tap Select, tap the ones you want, then Move or Delete.
Organise with folders
- To make a folder, tap + in Journals. In Notes, tap + and choose New Folder.
- To put a page in a folder, press and hold its card, tap Move to Folder and pick a folder. You can also drag a card onto a folder.
- To take it out, press and hold the card and tap Remove from Folder.
- To rename a folder, press and hold it and tap Edit.
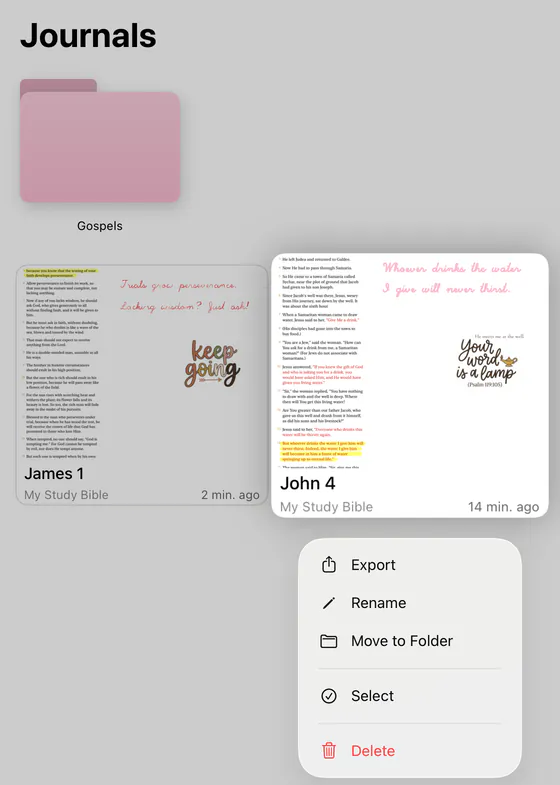
Save or share as a PDF
- For a journal page, press and hold its card and tap Export, or on the page tap , then Export.
- For a note, open it and tap , then Export.
Digible makes a PDF and opens the share sheet, so you can save it to Files, print it or send it.
Paths
Make a Path
A Path is a study plan of a few days, made around what you want to explore.
- Open the Paths tab and tap +.
- Under What would you like to explore?, write a feeling, a topic or a passage.
- Under How many days?, pick 3, 7 or 14.
- Tap Create my Path, then Start Path.
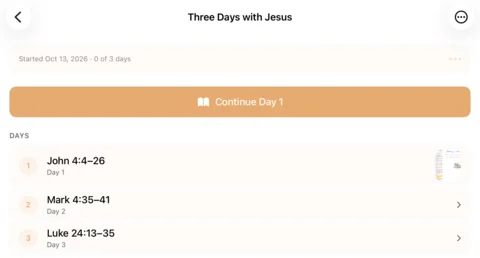
Follow a Path day by day
- Open a Path from Home or the Paths tab.
- Tap Continue Day 1 (or the day you're on).
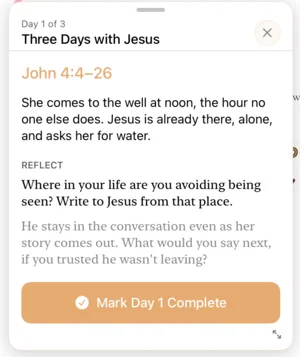
The day's chapter opens with a small card showing the passage and a reflection to write about. When you're done, tap Mark Day 1 Complete on the card.
Delete a Path
Open the Path, tap at the top right, then Delete Path. Or press and hold it in the Paths tab and tap Delete. This removes the Path and its history.
Widgets and preview
Add a Home Screen widget
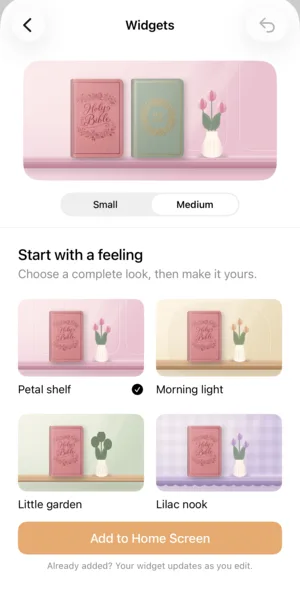
The Bible Shelf widget keeps your Bibles on your Home Screen. Tap a cover to continue reading.
- On Home, tap your photo at the top right, then Widgets.
- Pick a look under Start with a feeling, or change the shelf and wall colours yourself. Tap Choose and reorder Bibles to pick which Bibles sit on it.
- On your Home Screen, touch and hold an empty area. Tap Edit, then Add Widget.
- Search for Digible, choose Small (one Bible) or Medium (up to three) and tap Add Widget.
See your Bible in 3D
- On Home, press and hold a Bible.
- Tap Preview.
Drag to turn it, pinch to look closer and double-tap to open it. If you don't see Preview, update Digible from the App Store.
Decorate your Bible's cover
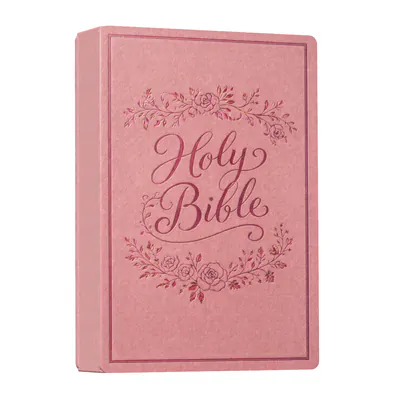
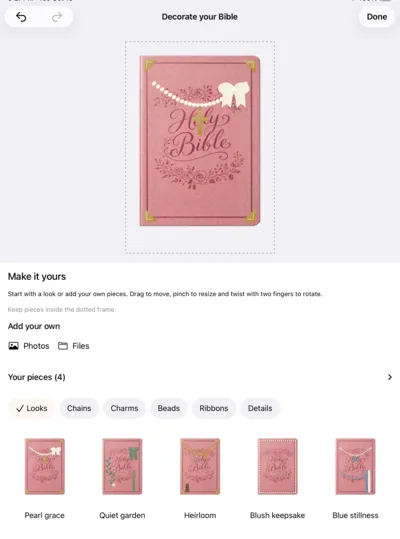
- On Home, press and hold a Bible and tap Preview.
- Tap
 Decorate at the top right.
 - Add charms, chains, beads, ribbons and more, or your own picture from Photos or Files.
- Drag to move a piece, pinch to resize it and twist with two fingers to rotate it. Tap a piece for its colours, size and Remove piece.
- Tap Done.
Account and subscription
Sign in and sync your devices
Sign in with the same account on each device and everything you make syncs by itself. There's nothing to turn on.
- On iPhone and iPad you can Sign in with Apple or with email.
- If you started as a guest, tap your photo at the top right of Home, then Create Free Account to keep what you've made.
Each device lists what it can edit: tablets list handwritten pages and notes, phones list highlights and typed notes. If something is missing on one device, it's on your other one.
Sign out
On Home, tap your photo at the top right, then tap  and Sign out.
Restore your purchase
On Home, tap your photo at the top right, then tap and Restore Purchases. Make sure you're signed in to the App Store with the Apple Account you paid with.
Change or cancel your subscription
In Digible, tap your photo at the top right of Home, then Manage on your subscription. Then:
- Change plans to switch plan.
- Manage subscription to cancel.
Or use Apple's Settings: open Settings, tap your name, then Subscriptions, Digible and Cancel Subscription (Apple's steps). You keep Pro until the end of the period you've paid for.
Ask for a refund
Apple handles payments made through the App Store, so refunds are requested from Apple at reportaproblem.apple.com: sign in, choose Request a refund, pick a reason and the Digible purchase. Apple's steps.
Daily reminders
On Home, tap your photo at the top right, then Notifications to set your Reminder time. To pause reminders, open the iPhone or iPad Settings app, then Notifications, Digible.
App language and dark mode
Digible follows your device's language. To change it, tap your photo at the top right of Home, then Language, and choose English, Español, Deutsch, Français or Português (Brasil). For dark mode, choose System, Light or Dark under Appearance.
Delete your account
- On Home, tap your photo at the top right.
- Tap at the top right.
- Tap Delete Account and confirm.
Your account is deleted 14 days later. If you sign in again before then, it's kept. Guest accounts are deleted straight away. Deleting your account doesn't cancel a subscription, so cancel it first. More on our delete account page.
Troubleshooting
Update Digible
Many fixes arrive in updates. Open the App Store, tap your profile picture and look for Digible under the updates, or search for Digible and tap Update.
Find your app version
From Digible 1.17.4, the version is at the bottom of your profile (for example Digible v1.17.4). On older versions, open the iPhone or iPad Settings app, then General, iPhone Storage or iPad Storage, then Digible.
Something is missing on another device
- Check you're signed in to the same account on both devices.
- Tablets list handwritten pages and notes. Phones list highlights and typed notes. Nothing is deleted: what you made on a tablet is still there on the tablet, and the other way round.
- Handwriting made on an iPad isn't shown on Android, and Android handwriting isn't shown on iPad.
My iPad can't update Digible
Digible needs iPadOS 18 or later. iPads that can't update to iPadOS 18 keep an older version of Digible that no longer gets updates, and what you write there stays on that iPad. Apple lists the iPads that run it on How to download iPadOS 18.
Report a bug
On Home, tap your photo at the top right, then tap and Report a Bug. Say what happened and what you were doing just before, then tap Send. Your app version and device are attached for you. Have an idea instead? Tap Suggest a Feature in the same menu.
Still stuck?
Tell us what you're trying to do on our contact page and we'll walk you through it. Let us know your device and which screen you're on, and add a screenshot if you can.